Search This Blog

Saturday 29 March 2014

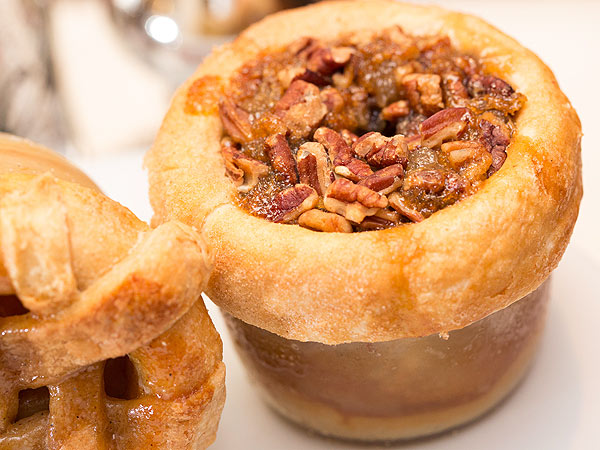
Apple Pie in Mason Jar

Apple Pie Filling
4 cups of sliced and peeled apples (we use a combination of red & green apples)
½ cup sugar
1 tbsp. butter
¼ tsp. cinnamon
1 tbsp. flour (add more for thicker consistency)
Pie Crust
1½ cups all-purpose flour
½ tsp. salt
½ cup cold unsalted butter
2 tbsp. ice cold water
Melted butter
Wide-mouth Mason jar (any size)

Apple pie filling directions
1. Combine all ingredients in a saucepan on high heat and cook until they begin to simmer. Do not allow them to boil.
2. Once the ingredients begin to simmer, turn heat to low and allow them to cook until the apples are soft enough to cut in half with a spoon. Then allow to cool and thicken. Filling should stick to the back of a spoon.
Crust and Baking Directions
1. While the apples are simmering, start on your crust. (As an alternative, you can use premade dough from the refrigerated section at your local grocery.) In a electric mixing bowl, add the flour and salt. Next add cold butter in pieces a little bit at time with a fork and begin to mix until incorporated. Lastly, add the water.
2. Once all the ingredients have been added, knead into a ball with your hands, wrap in clear plastic wrap and allow the dough to rest for a minimum of 30 minutes.
3. After the dough has rested, roll it out on a clean flat table. You may use flour on the table to keep the dough from sticking.
4. Use the lid of a Mason jar to cut out circles and place one in each jar bottom.
5. Cut out the pieces you need to cover the sides of the inside of each jar. Place enough inside so that the dough hangs over the sides of the jar, which allows for shrinkage while baking. Pour in your cooled apple pie filling to approximately a ¼-inch from the top of the jar.
6. Cover the tops of the jars with the remaining dough, brush the tops with melted butter and bake on a cookie sheet at 350F for 30 minutes or until crust is golden brown. Remove and allow to cool.
Friday 14 March 2014

Raw Cheese cake with Chocolate Ganache


There’s no better way to say “I love you” to yourself than with this treat. It’s a no-bake cake without refined flour and sugar; it comprises good satisfying fat and is fiber-rich and protein-packed. This always is a hit — whether served at dinner parties or potlucks. People remain surprised when you tell them what’s in it — or what’s not.

Part 1 – The Crust

  • ¾ cup almonds
  • ¾ cup macadamia nuts
  • ¾ cup pitted medjool dates
  • 1 tsp sea salt
1. Process the nuts into small pieces with salt in a food processor.
2. Add the dates and process until combined and sticky.
3. Press into the lined bottom of a springform pan and refrigerate or freeze until set.
4. Make the filling.


Part 2 – The Filling
  • 3 cups cashews
  • ¾ cup lemon juice, fresh preferred
  • ½ cup agave or maple syrup
  • ¾ cup coconut oil (must be liquid, place bottle in bowl of hot water if solid)
  • 1 tsp. vanilla
  • Optional: ½ pint raspberries
1. Cover the cashews in water and soak for about an hour.
2. Drain and place in blender with the rest of the ingredients. Blend until smooth.
3. Taste for preferred sweetness and tartness.
4. Pour into prepared springform pan. Place in freezer to set.


Part 3 – The Ganache
  • 1 ½ c. grain sweetened chocolate chips
  • 1/2 cup So Delicious Coconut Milk creamer  (or other nondairy creamer)
1. Place chips in a heatproof bowl.
2. Slowly heat the creamer in a pan, take off heat when it simmers.
3. Pour over chocolate chips and mix until chocolate is melted.
4. Cool for a few seconds while mixing. Pour over filling.
5. Decorate with fresh berries. Place in freezer to set.

When firm, place in the fridge until ready to serve.

Monday 10 March 2014

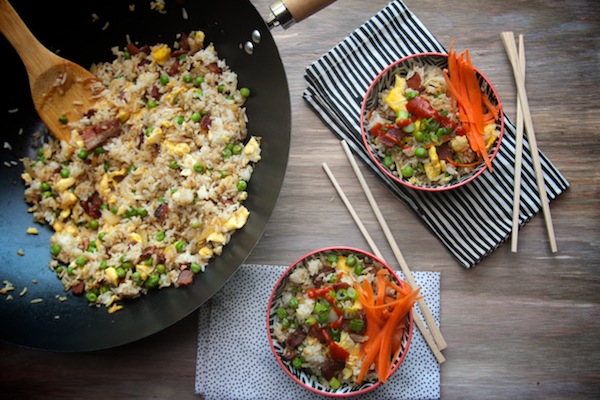
BACON FRIED RICE


Ingredients

  • 4 cups cooked jasmine rice
  • 6 slices bacon, diced
  • 1/2 large yellow onion, thinly sliced
  • 4 green onions, thinly sliced plus more for topping
  • 3 cloves minced garlic
  • 1 tablespoon finely grated ginger (from about a 1-inch piece)
  • 1 cup frozen peas
  • 4 large eggs, beaten
  • 2 tablespoons vegetable oil
  • 3 tablespoons soy sauce
  • 1/2 teaspoon sriracha (optional)
  • 1 carrot, thinly sliced or ribboned using a vegetable peeler, for topping

  • In a large non-stick skillet or wok over medium-high heat, cook bacon until it is browned and fat is rendered, about 10 minutes. Drain any excess fat from pan (you still want a thin layer coating the bottom) and push bacon to sides of pan. In the center, add onions and cook until softened, about 2 minutes. Stir in green onions, garlic, and ginger and cook for 3 minutes, taking care not to let the garlic brown. Stir in peas and cook for 2 minutes, or until warm. Transfer the mixture to a medium bowl.
    Lower heat to medium, add eggs and scramble for 2-3 minutes or until fully cooked. Add eggs to bacon mixture. Wipe out skillet (careful as it may be hot), add vegetable oil, and return to medium-high heat. When oil is hot but not smoking, add cooked rice and spread in an even layer. Cook, stirring occasionally, for 5 minutes, or until rice is heated through and slightly crispy. Stir in bacon-egg mixture. Season to taste with soy sauce and siriacha. Top with green onions and carrots and serve hot.
    Shutterbean Notes: 

    I pre-cooked jasmine recipe for this recipe a day in advance in my rice cooker. It’s always best to make fried rice with leftover rice because fresh rice gets gummy & sticky. Two cups of uncooked rice yields about 4-4 1/2 cups cooked rice.

Banh Mi Sandwich


Ingredients For each sandwich:

1 petit baguette roll or a 7-inch section cut from a regular length baguette, purchased or home made
Mayonnaise, real (whole egg) or homemade mayonnaise
Maggi Seasoning sauce or soy sauce
Your choice of boldly-flavored meat or tofu, sliced and at room temperature
3 or 4 thin seeded cucumber strips, pickling or English variety preferred
2 or 3 cilantro sprigs, roughly chopped
3 or 4 thin jalapeño pepper slices
Everyday Daikon and Carrot Pickle
1. Slit the bread lengthwise, and then use your fingers or a bread knife to hollow out the insides, making a trough in both halves. Discard the insides or save it for another use, such as breadcrumbs. If necessary, crisp up the bread in a toaster oven preheated to 325ºF, and then let it cool for a minute before proceeding.
2. Generously spreading the inside with mayonnaise. Drizzle in some Maggi Seasoning sauce or soy sauce. Start from the bottom portion of bread to layer in the remaining ingredients. (As with all sandwiches, you’ll eventually develop an order for layering the filling so as to maximize the interaction between flavors and textures.) Close the sandwich, cut it in half crosswise for easy eating, and enjoy.

Saturday 8 March 2014

Beef Rendang

This recipe for slow-cooked beef in a rich lemongrass and coconut sauce is well worth the effort.

Ingredients

For the rendang

  • 1 onion, roughly chopped
  • 1 tbsp chopped fresh ginger
  • 1 tbsp chopped galangal (or another tbsp of the above)
  • 1 tbsp chopped garlic
  • 1 lemongrass stalk, tough outer layer removed and roughly chopped
  • 1 tsp turmeric
  • 6 long red dried chillies, soaked in water and roughly chopped
  • 2 tbsp sunflower oil
  • 1 cinnamon stick
  • 6 cardamom pods
  • 650g/1lb 7oz braising steak, cut into 2cm/1inch cubes
  • 4 kaffir lime leaves
  • zest of a kaffir lime or lime
  • 400ml/14fl oz coconut milk
  • 1 tbsp of tamarind paste or juice of a lime
  • 50g/2oz desiccated coconut flakes
  • coriander sprigs to garnish
For the herby rice
  • 1 tbsp sunflower oil
  • 1 cinnamon stick
  • 4 cardamom pods
  • 250g/9oz basmati rice
  • 600ml/1pint 1½fl oz water
  • 2 tbsp chopped fresh coriander
  • sea salt
To serve
  • deep-fried shallots
  • 1 deep-fried red chilli

Preparation method

  1. For the rendang paste, place the onion, ginger, galangal, garlic, lemongrass, turmeric and chillies into a food processor. Blend to form a smooth purée.
  2. Heat a wok and add the oil. Fry the paste over a high heat until the paste turns darker and is highly aromatic.
  3. Add the cardamom pods (crush the cardamom pods gently with the back of a spoon before frying) and the cinnamon stick broken in half and cook for another minute then add the meat.
  4. Fry the meat in the paste stirring all the time, until it is well browned.
  5. Pour over the coconut milk and tamarind pure and bring to a gentle simmer, add the kaffir lime leaves and zest.
    Zesting citrus fruit
    1:02 mins
  6. Season with salt, stir well then reduce to a simmer.
  7. Cook for between one hour and one hour and a half, stirring frequently during this time. The meat should be really tender and the sauce really reduced and rich.
  8. Meanwhile toast the coconut flakes in a dry pan. Keep a close eye on this, as it will burn really quickly. It should be a lovely deep brown colour when ready. Blend to a powder in a small blender or pound in a pestle and mortar. When the rendang is ready stir into the mixture making sure it is well mixed in.
  9. For the herby rice, wash the rice really well under cold water, the water will run clear when it is washed enough. Allow to drip dry Heat the oil in heavy-based saucepan that has a tight fitting lid.
  10. Add the spices and fry for a minute.
  11. Add the rice and fry until the grains begin to turn an opaque white.
  12. Add the water and a good pinch of salt.
  13. Bring to the boil then allow to bubble away until nearly all the water has been absorbed and air holes are beginning to appear.
  14. At this point pop the lid on. Leave the heat on underneath for a minute (this will create lots of steam) then allow to stand for five minutes (do not remove the lid).
  15. Keep warm until everything else is ready. You can hold rice like this for up to half an hour.
  16. To serve, mix the herbs into the rice and divide between four warmed serving dishes. Next spoon on the rendang, finish with a few sprigs of coriander and serve immediately, garnished with the deep-fried shallots and chilli....

Pork Chops


  • Prep time: 10 minutes
  • Cook time: 15 minutes
  • Yield: Serves 4-6, depending on the thickness of the chops.

INGREDIENTS

  • 4 pork chops
  • 1 teaspoon bacon fat, grape seed oil, or olive oil (or other high smoke point oil)
  • Salt
  • 1-2 teaspoons of dry rub*
*Dad's dry rub:
  • 1/4 cup cumin seeds
  • 3 Tbsp whole black peppercorns
  • 1 Tbsp coriander seeds
  • 2 Tbsp sugar
  • 1 1/2 teaspoons sea salt
Combine cumin, peppercorns, and coriander in a heavy medium skillet. Stir over medium heat until fragrant and toasted, about 8 minutes. Cool slightly. Finely grind toasted spices in blender. Transfer to a small bowl. Mix in sugar and salt. Makes 1/2 cup.

METHOD

1 Heat a large cast iron frying pan to medium high or high heat (hot enough to sear the meat). While the pan is heating, sprinkle a pinch of dry rub spices (about 1/8 teaspoon or a little more) on each of the pork chops. Using your fingers, rub the spices into the meat. Turn the chops over and repeat on the other side.
2 Once the pan is hot, add a teaspoon of oil or fat to the pan and coat the bottom of the pan. Right before you put the chops into the pan sprinkle each side with a little salt, or you can salt the chops in the pan. Put the chops in the pan. Make sure they are not crowding each other too much. There should be space between the chops in the pan or the meat will steam and not sear properly.
Tip: Arrange the chops in the pan with the thickest, boniest parts towards the center of the pan where they get the most heat.
3 Sear the chops, about 2 minutes on each side. Watch carefully, as soon as the chops are browned, flip them. As soon as you flip the chops, if you are using a cast iron pan, you can turn off the heat. Cast iron holds heat very well and there will be enough heat in the pan to finish cooking the meat.
If you have chops that are a lot thicker than 3/4" (many are sold that are 1 1/2"-thick), you can put a cover on the pan and let the chops finish cook for 5 minutes or so (if you are using a cast iron pan and have turned off the heat, there should be enough heat if you cover the pan to finish the cooking of a thicker chop, if not, lower the heat to low and cover.
How do you know when the chops are done? If you wait until you see juice oozing out of the top of the chop, it is definitely done. Mom typically just keeps the chops in the pan, the heat is turned off, so the pan is losing heat. The pan initially provides enough heat to sear the second side. As it initially cools it is still cooking, though not searing the meat. After a couple of minutes, it's just keeping the chops warm....